S.P.A.Training Division

Flt No. TN8900A:
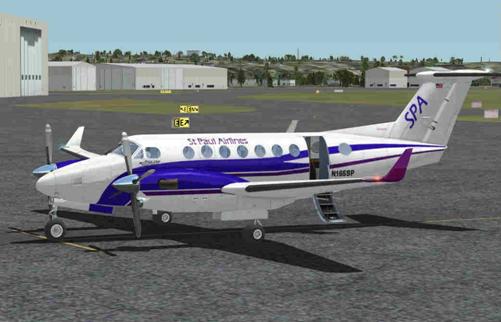
Aircraft: BE-350 (King Air) –SPA livery is available.
Location: Red Wing, MN (KRGK).
Weather: Clear, Visibility 20mi.
New Pilot's Course: THE SECRET TO A GOOD LANDING IS A STABLE APPROACH.
I would like to stress that this program is voluntary. You may do all, any part, or none of it. It is your choice. If you decide not to fly these flights now...please remember they are available for future reference.
SPA would like to start your Virtual Airline career as a CAT 1 aircraft pilot. These aircraft are found on the "Download" page St. Paul Airlines Aircraft.
NOTE: The lesson plan below is written using the BE-350, however it may be flown using any CAT 1 aircraft.
Once you have the aircraft loaded into your flight simulator program, learn to handle the aircraft properly by flying each flight as many times as YOU feel are necessary to achieve the degree of proficiency you desire.
NOTE: Do not use FS ATC function.
Training Articles:
(Requires Adobe Reader)
DOWNLOAD TRAINING ARTICLE : Basic Navigation Concepts
DOWNLOAD TRAINING ARTICLE : Interpreting Instrument Approach Plates
DOWNLOAD TRAINING ARTICLE : Introduction to ILS
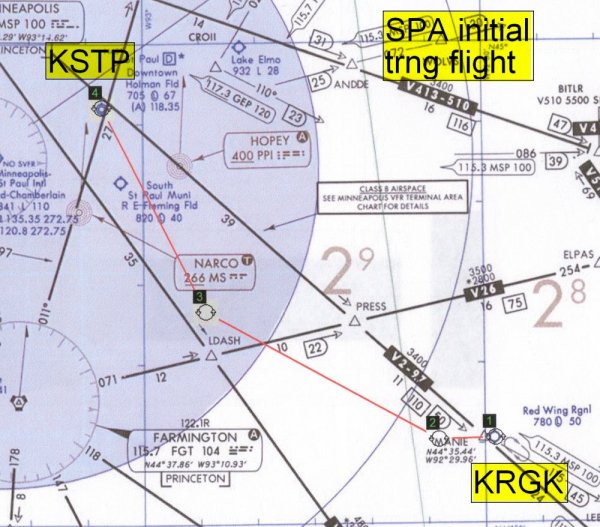
This flight will take you from Redwing, MN (KRGK) to Saint Paul Downtown-Holman Field (KSTP). KSTP is the airline headquarters airport.
· Start this flight from any parking area (Condition Levers - LOW for Taxi).
· Taxi to and depart Redwing from RWY 27 (Condition Levers - HIGH for take-off).
· Use weather set to clear and visibility set to 20 miles.
· Set wind to calm.
· Conditions for additional flights of this trip are listed at the bottom of this page.
Turboprop airplanes and how they taxi:
Condition Lever LOW (Ground Ops).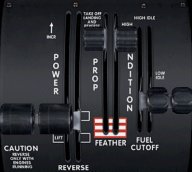
Condition Lever HIGH (Flight Ops).
- A turboprop airplane should be taxied with the "condition levers" in "Ground" (LOW) position. To accomplish this in FlightSim you use the "Mixture Controls".
- If this procedure is not used your airplane may taxi much faster than it should.
- Use your mouse to slide the condition Levers to the proper position.
- CAUTION: If "condition levers" are not set to HIGH prior to take-off you may crash off the end of the runway.
- The degree of difficulty encountered from Condition Levers/Taxi Speed depends on who developed the aircraft you fly. Some are realistic and some are not.
Route of Flight:
· Shown in red on the chart below.
Departure Setup:
- Complete your cockpit setup, including the before takeoff checklist.
- Set your course selector to: 323 degrees (this is the inbound course for the ILS RWY 32 approach at KSTP.
- Set the altitude alert to 2500 feet (good practice even if hand flying).
- Make sure your heading "bug" is set to 295 degrees.
- Set elevator trim to center position.
- Pitot heat to "ON".
- Auto-feather switch to "ON".

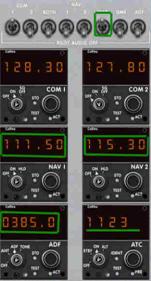
Radio Setup:
- Com Radios set.
- MKB to "ON".
- NAV #1 to 111.5 (ILS).
- NAV #2 to 115.3 (msp).
- ADF to 385 (LOM).
- Transponder as required.
Take-Off:
- Advance power to 50% TRQ.
- Release brake.
- Smoothly advance power to 90%…it should balloon up to 100% (adjust if necessary).
- SPEEDS:
- V1 = 105 kts (decision speed).
- Vr = 110 kts (rotation speed - smoothly, to about 10 degrees nose up attitude).
- V2 = 117 kts (takeoff safety speed - the aircraft can now fly on ONE engine).
- Try to remain on runway centerline.
Turn After Take-Off:
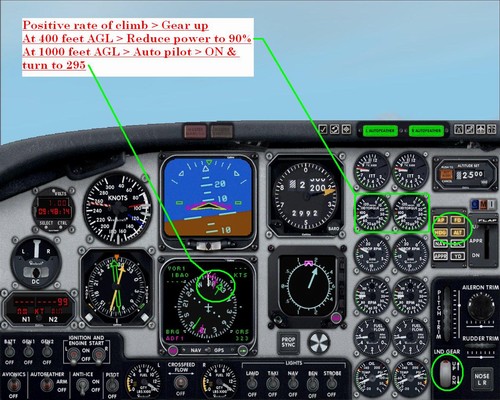
Climb:
- When you have a positive rate of climb = retract the landing gear.
- At 400 feet above runway height, reduce power to 90% TRQ.
- Hold 10 degrees nose up attitude.
- Allow airspeed to slowly increase (160-170 kts).
- “TRIM” to reduce stick forces.
- Leaving 1000 feet AGL (1700 feet MSL) > select autopilot - "ON" (Hdg & ALT).
- Verify the aircraft is now turning to heading 295.
- Level at 2500 feet.
- Turn Auto-Feather – OFF.
Level:
- Reduce power to 80% TRQ (speed should stabilize about 220 kts).
- Set prop RPM to 1600.
- When the LOC becomes
active (shows on HSI).
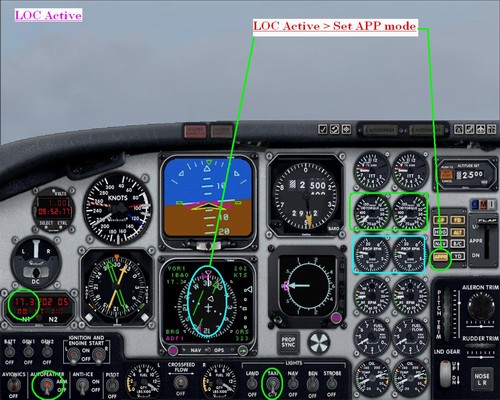
- NOTE: When the ADF needle (red) aligns with the course needle (green), then you are lined up on the LOC course. (IF-you have the inbound course set properly-323°).
- If you are flying a Coupled Approach (Select APPR Mode on the autopilot) Then the autopilot will capture the localizer, and track it inbound.
- If you are hand flying, then watch for the localizer needle to start moving, then start your turn to 323 degrees.
- Review the Missed Approach procedure again.
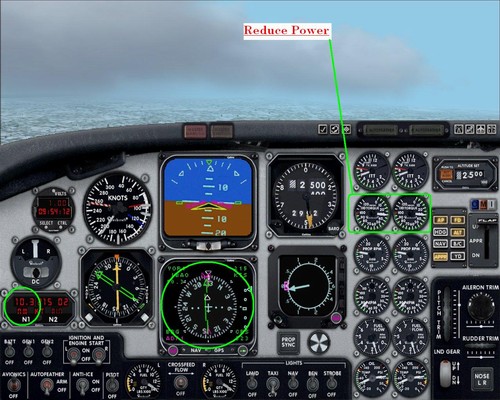
- At 11 DME, reduce power to
30% TRQ (looking for about 140 kts-slowly).
Approach:

Note: A better copy
of this chart can be printed from the
- When the GS (glide slope) moves off the top peg, select flaps to position one (App). May not apply for some airplanes.
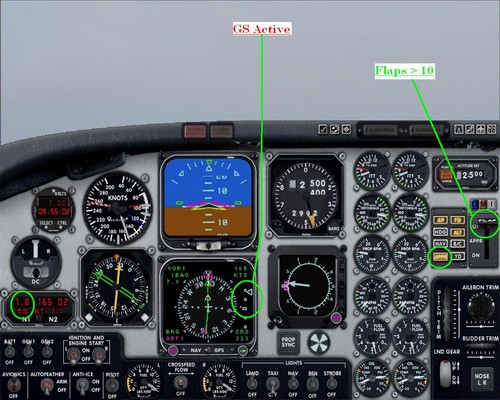
- Turn Auto-Feather “ON”.
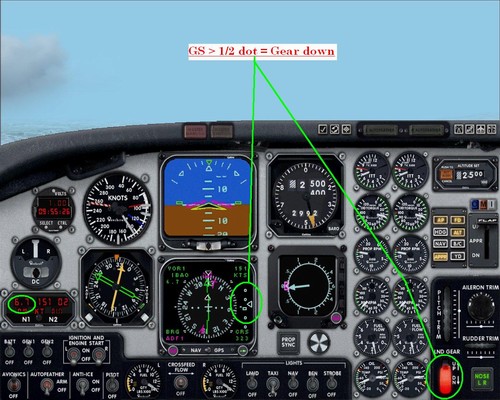
- When the GS (glide slope)
is ½ dot above center, Lower the Landing Gear -
speed will decrease further to about 125.
- When the GS captures, and you start downhill, reduce power to 20% TRQ & lower Flaps to “APP”.
At 1000 feet AGL: (1700 MSL):
- At 1000 feet - Reset HDG bug to 010 (in case of a missed approach - note this is not the inbound ILS course).
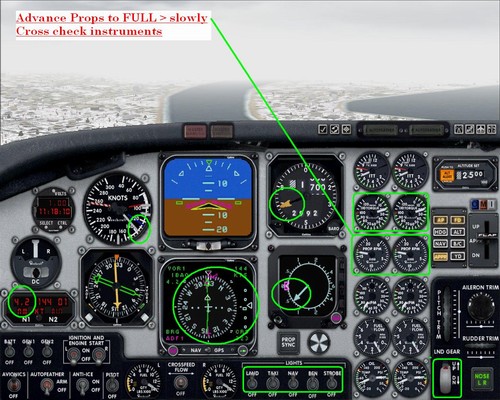
- Increase prop RPM to FULL - slowly to avoid surge.
- Perform Instrument cross check - make sure all looks good and correct.
At 300 feet AGL:
- At 300 feet AGL (1000 feet MSL) lower flaps to FULL – if landing is assured.
- Reduce power to 10 - 15% TRQ.
- Target landing speed is 109 kts.
- Turn OFF auto-pilot prior to 200 feet above ground level to avoid oscillations.
- TRIM - watch the Glide-Slope & Airspeed.
- Stay lined up with the runway centerline.
- FLARE (TRIM will help this).
- Land slightly nose up; reverse engines, and apply brakes as necessary.
- Come out of reverse prior to 40 kts, and turn off the runway.
- Perform the after landing check list.
WELCOME TO ST. PAUL DOWNTOWN-HOLMAN FIELD
Repeat this flight with the following variations:
Flt No. TN8900B - Repeat the flight with clear wx, and hand fly the airplane.
Flt No. TN8900C - Repeat the flight, with wx set to 2000 feet MSL on the FS scale, and 3 miles visibility and let the autopilot fly again. Watch how it goes.
Flt No. TN8900D - Hand fly again, with wx at 3000/5.
Flt No. TN8900E - Hand fly with wx at 2000/3.
Note: These five flights are counted as PIREP time. Please send a PIREP for each (from the SPA home page) to your HUB Manager. If you fly any of the above flights more than once please add the appropriate number behind the Flight letter (Example > TR8900A2 etc.), this will denote the second time to fly this trip.
Thank
you for flying with S.P.A.
Keep the dirty side down
Questions or comments may be forwarded to Jerry Allen: grumpyjerry@hotmail.com
Suggested additional flight training:
- LOC BC approach with autopilot
- VOR approach with procedure turn
- Circle To Land
- Fly an arc to an ILS approach
- NDB approach
- Losing an engine on a twin
- KSTP ILS RWY 32 Missed Approach Procedure
- Commuter First Officer Line-Check