HOW TO FLY YOUR SPA
TRANSPORT CATEGORY JET
KNOW YOUR "v" SPEEDS!
V1
Vr
V2
Speeds will be different for each model of aircraft, and different
weights for the same aircraft.
STANDARD NOISE ABATEMENT TAKEOFF PROCEDURE
This procedure will be used at all airports to standardize takeoff procedures and can
be used with both normal and reduced thrust takeoffs.
1. When clearance is received for takeoff, scan annunciator panel and taxi to runway.
Set the heading bug on the runway heading as an aid in maintaining directional control
in the event an engine fails after V1.
2. When turning into takeoff position, smoothly advance throttles so that the engine
bleeds are closed when lined up on the runway. Scan engine instruments for abnormal
indications. Continue advancing the throttles until reaching takeoff EPR. Set power
by 60 knots. NOTE: The EPR rise that occurs above T .0. power setting during takeoff
roll must be trimmed out by 60 kts as this rise is not acceptable.
3. Apply forward column pressure as necessary to retain good steering and a smooth
riding nose wheel. Especially on wet or slushy runways, the forward column pressure
should be reduced to minimum by approximately 70 kts (start of tire hydroplaning).
This will decrease the possibility of water ingestion and compressor stall and help
rotation to be smoother at Vr .
4. At Vr, initiate a smooth, steady up elevator movement requiring a positive pull force
and a five second interval to rotate to an approximate 15° pitch attitude. On the -50,
a seven second interval to rotate to an approximate 20° pitch attitude will be
necessary. CAUTION: Early or over rotation can cause the tail to strike the runway.
5. With a positive rate of climb indicated on the altimeter, position the gear up.
Continue the climb to 1000' AFL (above field level) at Minimum V2 airspeed / maximum
15°(20° on -50)pitch attitude accepting an airspeed greater than V2 when it occurs.
No turns to be made below 300' AFL. Above 300' AFL the maximum bank angle is 15 °
dirty or clean until reaching BSEC (Best Single Engine Climb speed), and then
maximum bank angle is 30° .
6. At 1,000' AFL, lower the nose to approximately 10° pitch attitude to allow the
aircraft to accelerate. At an airspeed of V2+10 kts, set flaps to zero. Allow the
aircraft with slats, to further accelerate to V2 +35 kts, and retract the slats while
climbing to 3000' AFL.
7. After flaps are zero, and on applicable DC-9's the slats are retracted, accelerate to
BSEC. When reaching BSEC, set power to 1.6 EPR (1.7 EPR on -50). NOTE: During adverse
conditions the power may be left at takeoff setting (not to exceed 5 minute
limitation) or may be reduced to climb power .
8. At 3000' AFL resume normal climb power, accelerating to 250 kts at 500' to 1000' per
minute climb rate. Climb at 250 kts to 10,000' MSL and at 290 kts/.72M above 10,000'
MSL. At high gross weights, transitioning from 290 kts to. 75 mach will provide
optimum fuel savings.
CLIMB
Maintain maximum climb power during climb and acceleration to cruising airspeed.
Depending on the aircraft type, this is usually around 290 knots up to about FL 200
then transition to Mach Number of between .65 and .75.
CRUISE
Initial cruise power setting may be read from quick reference information charts if you
have them available. If not, most jets cruise between mach .72 and .84 - again
depending on the aircraft.
DESCENT
For a straight-in landing with zero wind use the 3x1 descent ratio.
I.E. > If at FL310 > start your descent about 93nm from the runway end of intended
landing. Remember to subtract the field elevation. I.E. > DEN = FL310-50=26x3=78 miles
out. Rate of descent should be between 1500 - 2000 fpm. at flight idle power. The
start down point will need to be adjusted for wind > dogleg approach > ATC restrictions
etc as well.
Most ATC controllers will require you to cross about 30 miles from the airport at either
10,000 or 11,000 feet. Some will require 250 kts at the mileage fix also.
Keep track of how well you are doing during the descent using the same rule:
>At 25,000 feet above field - should be 75 miles out.
>At 20,000 feet above filed - should be 60 miles out.
>At 15,000 feet above field - should be 45 miles out. etc.
LANDING
Determine aircraft landing weight from the fuel totalizer gauge. If the totalizer is
inoperative, or unavailable subtract fuel consumed by both engines from the ramp gross
weight. If a traffic pattern is required, it will normally be flown at 1500 feet AGL
on downwind leg with the in-range check complete. Position wing flaps to 15" (?) and
allow airspeed to bleed to 1.4 x Vs + 10 kts for this configuration. When turning base
leg, place gear down and complete landing checklist. Turning on final approach,
position wing flaps to 40" /50" .When bank angle is less than 15" , establish airspeed
on Vref + wind additives.
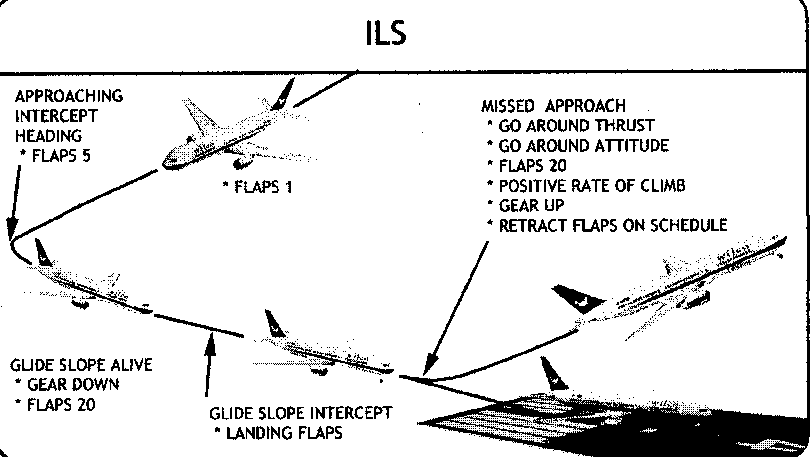
Join the LOC between 5 to 15 nm out from the OM - depending on the complexity of the
aircraft being flown. In a CRJ or F-28, 5 nm from the OM will work fine if slowed to
200 or so at that point. If flying a B-747, then intercept the LOC about 15 nm from
the OM with enough flaps extended to be slowed to at least 220 at the 15 mile point.
It takes longer to configure a heavier, more complex aircraft.
If you do not know what altitude to intercept the Glideslope at (just prior to the OM)
then use1600 feet above field elevation.
 >>> KNOW YOUR Vref SPEED >>>Vref_________

When the main gear touches, the spoilers will extend (if armed), but may not immediately
extend if the runway is wet or slippery because of lack of wheel spin up. Spoilers must
then be extended manually. Pull throttle reverse levers immediately to interlock stop
position while simultaneously lowering the nose to the runway. Reverse thrust power may
be trimmed to 80% N1. Upon reaching 70 kts, gradually reduce reverse thrust so as to
reach reverse idle detent position by 60 kts. Leave throttles in reverse idle detent
until forward thrust is needed however, they must be stowed before turning off the
runway. Raise flaps to zero after you exit the active runway.
The takeoff and landing picture profiles are taken from a B-767 hand book. The text is
taken from a DC-9 book. Notice: With older underpowered aircraft (DC-9 & B-727 etc.)
the takeoff profile will usually be flown at V2 speed, or V2+10. With your heavier
well powered aircraft like the B-767 it is usually flown at V2+15. In all cases it is
best to know the specific pitch attitude needed for each airplane during rotation:
i.e. > DC-9-30=15° > DC-9-50=20° etc.
These minor differences are a result of studies from the manufacturer and the company
operations manuals.
A STABLE APPROACH EQUALS A GOOD LANDING.
Yet another discussion about jets
This one is for the brave hearts of the Flight Sim world that
take on the challenge of flying jets. Most people quit as they keep on crashing,
and then revert to lighter and slower variety.
As I go on, I will divide the write up into numbered paragraphs, rather than a
continuity, in order to highlight and illustrate how and why jets are different,
not tougher, to fly, than their propeller counterparts.
THE FUSELAGE, SWEPT BACK WINGS AND THE JET ENGINE
I would like to break the jet aircraft into three parts, the fuselage, swept
back wings and the jet engine.
1. The Fuselage, or the tubular structure. Designed for speed and minimize drag,
but where lies most of the weight and gets us to the first and most important
difference between earlier generation airplanes – mass.
2. Secondly the Swept Back wing – once again optimized for speed .It brings
along its own set of aerodynamic rules, and while predictable, still requires to
be nurtured very carefully. It is designed for high speed - high altitude
flight, so requires flaps to give it assistance in the low speed / low altitude
regime .It is here that the drag really manifests itself as a formidable foe,
and along with response times of a jet engine can be a handful to master in the
learning stage.
3. And lastly, why we call it a jet – the Jet Engine itself, a marvelous
invention with tremendous thrust to weight ratio, which provides all the
“oomph”, we need. This kind of motor also has its own set of laws as far as
handling goes. Most important to a pilot is “Spooling times”. Unlike a
piston engine the delivery of thrust from a jet engine is “neither
instantaneous nor proportional” to the lever movement .On the numbers,
apply park brakes and “open” the thrust levers. Check out the time it takes
to go to max N1.Once stabilized, bring them to idle and again note the time.
Both figures should be between 8 to 10 seconds!!
Briefly, here are the “whys” of spooling times. The turbines are big and
heavy, so when thrust levers are moved to demand more, fuel goes in to the
combustion chambers. While the energy is produced it takes a few seconds for the
engine to start turning quicker due inertia. Similarly, when reducing thrust,
the massive turbines continue spinning, again due inertia, delivering thrust,
and after a few seconds, begin dying down
One very important point, just because the engines are turning at 55% N1 does
not mean you are getting 55% of its output. In fact it is lesser than that. As I
said the thrust output is not proportional. The graph is not linear, so up to
60% maybe 50 percent output, up to 85% percent maybe 70 %, and thereafter
crossing 90% is where all the “kick” lies .So if you ever find yourself in a
thrust deficit situation, give it a handful. At low speeds drag increases also.
The thrust increase has to take care of quite few things at one time, recover
lost speed, and overcome ever-increasing drag, and the get over the inertia of a
heavy and slowing down plane.
FIRST ORDER DIFFERENCES
The first order differences between props and jets are size that is mass, speed
and finally their the product - momentum.
1. MASS – As time went on planes became bigger carrying more people and ever
increasing amounts of freight. Today’s jets carry fuel equal to or more than
their own weight. So the aircraft when heavy behaves very differently compared
to when light.
You can create this scenario and must check it out on the flight sim. Give
yourself 10 percent fuel and a standard day; fly a circuit. Then on the next
circuit, increase fuel to 100% on an ISA+30 day and fly another circuit … do
you feel the difference!! Pity we cannot manipulate passengers and baggage on
the sim .The same plane feels totally unique and almost like two different
planes or ”type ratings “ on each circuit. This mammoth size also requires
big control surfaces and hydraulic muscle to give us total control in the three
planes.
2. SPEED – Without a doubt these machines are quick, and will get quicker …
if the distance seems compressed, so is the time. Those on the flight deck need
to think quickly. The ground is being eaten up anywhere between 2.5 to 8
nautical miles a minute depending on the phase of flight. “Never let the plane
get you to a place your brain hasn’t been to 5 minutes before “ – they
told me. This implies think ahead .For the slow coaches they coined another one
– “he/she was so far behind the plane that if it crashed, he/she wouldn’t
be in it!!” hee-haw…
3. MOMENTUM – the product of mass and speed
So am I going into equations or being mathematical. Well no. But the science of
flying is a game of numbers …at least in the beginning. When one starts flying
lessons, you are fed with numbers, speeds, rpms, flaps, altitudes, and then when
you graduate onto jets, the theory still remains. You get a sheet of reference
attitudes and thrust settings. 'Fly by numbers' they say.
Where flying becomes poetry in motion is how you achieve the changes in flight
path. In a smooth deliberate way or chasing the needles, be it on the box or in
the real world. Sure the sim has no seat of pants feel, nor sounds like the real
thing, no smell, no g-force, the cockpit is alive as far as I am concerned with
its own cues for you to sense, but to fly the real thing or the box, requires a
certain finesse.
Prior to applying a control input, which may be control surface deflection or
thrust, certain amount of anticipation will be required, that is staying ahead.
For example, while coming up a level off altitude, the reference attitudes and
thrust settings should be ready to apply.
Then when you do apply a control input, wait a while for the response, of the
Jet that is. The plane has a lot of mass, a lot of speed. That means momentum.
Any change required in flight path will take a while. Push and shove
philosophies don’t work with jets. I will confess that there were times when
the jet flew me, rather than the other way round. Simple -- I was anticipating
and applying the correction, but was impatient for the response ... and
therefore ended up over controlling and started porpoising -- going up and down
like a roller coaster. These are called “pilot induced oscillations”. Mr.
Momentum was responsible for this .If you are handling a biggie, he will always
be around. When you change flight profile by adjusting attitude or thrust, give
the plane time to react and settle down, and do not be in a hurry to change a
stable and established flight path either. The transition period is very
important. With experience it becomes second nature and is more easily achieved.
ATTITUDE + POWER = PERFORMANCE
The fundamental equation of jet flying is --- ATTITUDE + POWER = PERFORMANCE.
Remember this always. Let me elaborate.
1. First, -- the first part – ATTITUDE, to say the least, compared to the
props, are greatly exaggerated. You deal with a whole range of them in various
phases of flight. Right from 15 or 20 nose up on take off, to 4 degrees nose
down in descent, and you better keep a strict watch on Attitude before it is
termed as an “ unusual” one. Undoubtedly the attitude indicator becomes the
primary reference instrument in any phase of flight.
2. Now the second part – POWER, somewhat the wrong term, it should be, and
only be THRUST, as jet engine output is measured in pounds thrust, not
horsepower … and you have a whole lot of it. As mentioned earlier the same
plane behaves extremely differently when it is heavy, and a beast out of control
when the plane is light, in real life it seems almost two different planes!!!
The response of a jet engine is not proportional to thrust lever movement, so
when increasing or decreasing thrust, think how much you need to move the lever,
and pay great attention to the response time also.
3. PERFORMANCE – now combining the above two, here lies the difference from
props. These planes are fast; watch not only the indicated airspeed, but also
the groundspeed to take care of the lateral plane. And they can also move up and
down the vertical plane pretty quick, that is climb and descend. So keep an eye
on that IVSI (instantaneous vertical speed indicator).
Nail the attitude, set the thrust, and see if you get the desired result. If
not, in a very refined manner fine-tune it, don’t go about chasing the speed
or altitude or vertical speed you want – you will end up in a mess.
So know the figures of attitude and thrust required in the selected
configuration for each phase of flight, and this coins the phrase – FLY BY
NUMBERS.
Example
 |
 |