The 387th Bomb Group Project
Phase 2
Bombardier Training
Introduction
Good morning gentlemen (this was 1943, no ladies in the class). There are basically three ways to drop a bomb on a target. Two of them are simple, accurate and dangerous. The third is complicated,
inaccurate and, comparatively, safe.
So, let’s take number one, dive bombing. Strap a bomb on the belly of your plane, climb to altitude above your target. Take your chewing gum out of your mouth and stick it in the center of your
windshield – really, this is exactly how it was explained to me. Now, go into a steep dive and orient your aircraft so that the wad of gum is on your target and release your bomb. If you are directly
above your target and there is no wind, the bomb falls straight onto your target, and bingo, or bombgo! So much for your target. This is how the Navy sank three Japanese carriers in a few minutes in
the famous battle of Midway. What could go wrong? Well, if your target is defended by antiaircraft guns, the gunners need not traverse their guns, lead the target, or worry about range. They just
point directly at you and shoot. Sooner or later, you run into their rounds and are shot down. However, later in the war and in combination with machine gun strafing, a variation of this technique
from low altitude, involving attack angles much less than 90 deg., was used to very good effect by USAAF fighter-bombers like the P-47 to attack isolated, weakly defended tactical targets from low
altitude. The German Stuka dive bombers had been using these tactics from the beginning of the war.
The second method is skip bombing. The USAAF used this technique very effectively from B-25s against Japanese shipping in the South Pacific. It works just like skipping a flat stone across the
surface of a lake. Fly just above the surface of the water and straight towards your target. At the appropriate range, release your bomb and it will skip across the surface of the ocean and into
the side of the ship you have targeted. Again, you are an easy target, for the same reasons.
Which brings us to the subject of this training: high altitude bombing from straight and level flight at a constant speed (aka the bomb run). You are now a much harder target for flak gunners to hit.
There will be another problem, interceptors, and we will come to that in due course. But, as you are now a much harder target for your enemy, likewise, he is a much harder target for you. Kinda like
the saying, “tracers work both ways”. Think of it as reciprocity.
This is a much harder problem to solve, and fundamentally akin to the problem faced by the artillery. How do I hit a target when my projectile will not follow an approximately straight line to the
target? The answer is one word: ballistics. This is a big subject and we don’t have the time, and you probably don’t have the patience, to go into it in much detail. So, we are going reduce the
problem to one single diagram.
Start by imagining the problem of dropping a bomb on a target is a vacuum. The problem of how to fly an airplane in a vacuum is left as an exercise for the student. As you probably know, the
velocities of an object in a vacuum are independent in the horizontal and vertical directions. So, the bomb continues to have the same (constant) velocity as the airplane in the horizontal direction
and accelerates (from rest) under the force of gravity in the vertical direction. The trajectory of the bomb is thus as illustrated as the “vacuum trajectory” in the diagram. Since the aircraft and
the bomb have the same horizontal velocity, the bomb will always impact directly under the current position of the aircraft, no matter the altitude from which it is dropped. However, we are not operating
in a vacuum while flying over Germany (or even over France). Accordingly, we have to consider the effects of atmospheric drag on the bomb as it falls. First, the drag slows the bomb in the horizontal
direction, causing it to impact behind the aircraft, by a distance called the trail. Second, the drag causes the bomb to fall more slowly than it would in a vacuum, eventually achieving a maximum vertical
velocity called the “terminal velocity”. This also affects the trail, because it means the bomb takes longer to hit the ground than it would in a vacuum. As a result, the shape of the bomb’s actual
trajectory is determined by the drag of the bomb and that depends on the details of the design of the bomb and affects the horizontal and vertical components of the bomb’s velocity differently as the
bomb descends. This is a non-linear problem and is not simple. So, the people who do these things resort to making actual measurements in the field of bomb trajectories and are able to determine the
trail, as a function of initial horizontal velocity (aircraft speed) and drop height (aircraft altitude above terrain). These data are compiled in tables for each bomb type and these tables are used by
the bombardier in setting up the bomb run. All of this, and more, is summarized in this instructional article, used to train WWII bombardiers (reference needed).
The WWII bombsight (for the U.S., The Norden Bombsight – but other belligerents had equivalent devices) is an analog computer which inputs the aircraft’s height above the ground and observed groundspeed,
along with the tabular data on the ballistics of the bomb type in use, to determine the dropping angle. We will just refer to this as the drop angle. It then continuously compares the sighting angle
with the drop angle, and when the two are equal, it drops the bombs. Except that we have neglected to take into account that the airspeed and the ground speed are different (affecting the drag) and
that there will be winds, both along the bomb run track and across the track, which have to be taken into account to change the aircraft heading to maintain the aircraft track towards the target and to
offset the track upwind of the target, so that the crosswind will blow the bombs downwind into the target after they are released. So, now you are beginning to understand why the Norden bombsight was
so complicated, and why the bomb run had to be conducted at a constant altitude and velocity, to allow the bombsight to solve the problem and drop the bombs at the exact spot in time and space to allow
their ballistic trajectory to intersect the target. You now also understand why most bombs missed the target, because even a small error in the determination of any of these variables spoiled the solution.
And we haven’t even discussed the effect of time variable winds or wind shear. Whew! For an interesting article on the development of the Norden Bombsight, try this.
(https://www.csh.rit.edu/~lueking/citations/the-bombsight-war-norden-vs-sperry.pdf)
I suppose that you will not be surprised to learn that (to my knowledge) no one has devised a working “kinematic” bombsight for installation in FSX/P3D. The problem is not too severe when bombing from
low altitude, as the drop time is minimal and the trail is small. In fact, in the limit of zero altitude, this is about what the Kamikazes did at Okinawa. However, we’re back to the “what’s sauce for
the goose is sauce for the gander” problem. If it’s easy for you to hit them, it’s easy for them to hit you. So, it’s up to high altitude to avoid the flak, and that makes the bombsight problem much
worse.
So, to recap the basic point. To hit a target from a horizontal bomb run, you need to determine the drop angle for your bombs. This is a bear of a problem and it is the reason that the USAAF had to
field many hundreds of bombers to successfully destroy a given target.
Those of us working in the SPA 387th Bomb Wing Project have an additional problem. We don’t have a bombsight of any sort and do not even have a ready means of determining the target sighting angle
at a given point in time. We also do not have a set of ballistic tables for the bombs we will be dropping. Here in the chronically understaffed and overworked SPA Research Division we have been working
away on this problem for some weeks now, with limited success. More about that later.
Gentlemen, Arm your Bombers
We have now reached the critical stage in the 387th Bomb Group Project. Your new B-26 will be of little use if you cannot carry and drop bombs. If you fly against an assigned target without a
bomb load, you will be doing so “strictly in a staff capacity”, as an old military joke puts it. To gain the ability to drop bombs, you will have to follow instructions carefully.
A fellow named Chris Sykes has kindly incorporated the work of several others into a package called the FSX Weapons Pack 4, available again from our good friends at Fly Away Simulations,
and available here: https://flyawaysimulation.com/downloads/files/17904/fsx-weapons-pack-4/.
You will need to download and install this product into your FSX directory. The download contains
explicit instructions for installation. There are three parts. (1) Extracting and installing the Weapons Pack “Effects” folder into your FSX directory. In the end, you need to get the file
“fx_explosionsmoke” into your FSX Effects folder. [ FSX>Effects>fx_explosionsmoke] (2) Extracting and Installing the “Sim Objects” folder from the “US Weapons” folder into the FSX “Sim Objects”
folder. At a minimum, you need to get the M117 file into your FSX Sim Objects folder. [FSX>Sim Objects>Misc.>M117]. These things did not happen automatically for me, so I had to cut down and
ensure that these files were in the right place by hand and (3). Start an FSX flight, select the B-26 you wish to fly and place it at the desired starting location for a given set of flights
(e.g. Eglin AFB) and save the flight. Now, find the saved flight file and add two lines to the bottom of that file for the M117 bomb as described in the instructions. Then resave the flight.
Every time you make a 387th BG flight, load that starting flight, adjust the month and day and weather to those prescribed and start the flight. That will add the desired type and number of
weapons to your bomber, and they will be there every time you load that flight. As we change operating bases, change the saved flight to the new base.
These steps will arm your B-26 with the low yield, training version of the venerable M117 750 lb., general purpose bomb. This bomb was not available until after the war, but it’s the closest
we can get to historical accuracy. It will be sufficient to allow you to score your bombing runs in training. Since the internal carrying capacity of the B-26 is 4000 lbs., you can get, at
most 6 M117 bombs (cheating a little) into your bomb bay.
A word of caution. The two Weapons folders available in this download include a large number of modern weapons, air to air missiles, cluster bombs, guided bomb units, etc. These too,
like the GPS, are anachronistic, and besides, they will do you no good on your assigned missions.
Phase 2 Training Missions
The three (actually, five) most important things a B-26 bombardier trainee can know are:
(1) Shift E + 2 opens/closes the bomb bay door. If the bomb bay doors are not open, no bombs will fall.
(2) Shift D drops one bomb, Shift D repeated twice, drops two bombs. Hold down Shift D long enough and you will salvo your bombs.
(3) Your bombs will fall in a more or less straight line along your aircraft bomb run track. Bear this in mind when planning your bomb run.
(4) Your bombs will impact the terrain at point (Pt) somewhere between the point directly below your aircraft when they are dropped (P1) and the point directly below your aircraft when they impact (P2)
(5) The quantity Pt – P1 is called the horizontal range, and the quantity P2-Pt is called the trail.
There are a lot of other things you will learn about bombing and the M117 bomb, but we’ll come to those after you have acquired a little experience.
So, to start things out, we will have you make you firstr bomb runs from 2000’ AGL at 200 KIAS under zero wind conditions. This will give us a common base from which to make comparisons and
it will begin to train you in setting up and making a disciplined bomb run on a fixed target. Don’t worry, you’ll be getting a chance to “yank and bank” in the next segment of your training..
The Phase 2 Training Missions
Now that we are at Eglin AFB and you have armed your B-26, we’re ready to get to work. The good thing about Eglin is that we have a number of test ranges for testing weapons under development and we
can use these to train our new bombardiers. Specifically, we will be using one of the auxiliary ranges, FL34, aka Test Site B6. FL34 is an abandoned runway. Why bomb a runway? Two reasons: you’ll
be doing a good deal of this if you make it to the ETO, and, more importantly, a runway provides a ground length scale which will allow us/you to score your hits. Runway 38/18 at FL34 is 0.8 NM in
length.
So, to start things out, we will have you make you firstr bomb runs from 2000’ AGL at 200 KIAS under zero wind conditions. This will give us a common base from which to make comparisons and it will
begin to train you in setting up and making a disciplined bomb run on a fixed target. Don’t worry, you’ll be getting a chance to “yank and bank” in the next segment of your training..
902106 (KVPS-KVPS)
4/20/43. 1000 hrs. Set weather to clear skies (no wind). Bomb load will be six M117 bombs; adjust your stored flight accordingly before beginning this mission. Pick your own fuel load, but make
sure to include a load of 4500 lbs. in the bomb bay. Take off Eglin Main (as it’s known), turn to course 309 deg. And climb to 2000’ and accelerate to 200 KIAS. Locate FL34 turn right to 360 deg
and fly north well across I-10. This is effectively the northern boundary of the Eglin test range. Make a 180 deg turn and make a course for the north end of the FL34 paved runway (Rwy 18).
Cross the “bomb line” 3 NM south of I-10 and open the bomb bay doors. If you release ordinance north of the bomb line, I will catch hell from range safety (been there, done that) and you will
probably be court martialed. Target the numbers on Rwy. 18. Your objective is to land as many bombs as close to the numbers as you can, but it has to be from 2000’ AGL, no cheating. You
have six bombs. You can elect to drop one bomb and make six runs, drop two bombs and three runs, drop six bombs and make one run…. you get the idea. Determine the distance between the numbers
and each of your six bomb strikes. Add these numbers. That is your score for this mission. It’s like golf, the lower, the better.
To score your hits, do this during your bomb run(s): Start by going to the bombardier’s view position (F9, A ,A ) as you near the target. Using your best judgment, steer the aircraft towards
the target, release your bomb(s) and immediately pause (P) the simulation. Switch to the outside (F11) view and pivot around until you are looking at your aircraft nose on. Pivot your view until
you can see the bomb(s) below and behind your aircraft (yes, you can see them fall), hit P again and watch as your bomb(s) impact the terrain. Again, immediately pause your simulator. Switch to the
F12 view, or move your F11 view to directly overhead at longer range (Ctrl + =), and snap a screen shot of a view in which you can see both the runway numbers and your bomb strike(s). Make a print.
Using a ratio to the runway length, measure the six distances between the bomb strikes and the numbers on the runway. This may take a little practice. You may have to take two screenshots so you can
scale the measured “miss-distances” of each bomb strike to the length of the runway ( 0.8 NM = 4861’) This is your score, record it in feet. Return to Eglin main and land. Park on the pad south of
Taxiway T and head over to the ‘O’ Club to debrief and have a few beers. Repeat this flight as often as desired, but be careful about the beers. Remember, no smoking for 24 hours before your next
flight and no drinking within 50 feet of the aircraft. See what you can learn from your experience about how to target your M117 bombs.
So how did you do on your first try? What fraction of the bombs you dropped landed within the 70 M destructive radius of this weapon (see below)? If most did, congratulations, maybe you know
something I don’t. We should talk. If not, follow me as we look for a more organized approach to this problem.
So far, we have been loading and dropping the M117 bomb. This is a general-purpose bomb actually used in Korea and Vietnam. It weighs 750 pounds, and packs a maximum warhead weight of 386 lbs. of
tritonal, giving it the ability to collapse buildings within about 100 ft. of the impact point, and to do some damage to unprotected personnel and aircraft out to perhaps 400 ft., so we will use a
destructive radius to 200 ft. for scoring purposes. This is a pretty big weapon, even with the reduced warhead weight we will be using in training. Moreover, ballistics tests on this weapon indicate
(see below) that we have been equipped with the M117 R version, with tailfins which retard the forward motion of the bomb, producing a large trail distance, so that the bomb impacts much farther behind
the aircraft (small horizontal range, large trail) than a conventional streamlined bomb. This is useful for avoiding aircraft damage in a low-level attack, but is problematic for medium level bombing
(you’ll see why). It also means that you wouldn’t want to be carrying this bomb as “external stores”, because of the increased drag of the tail fin assembly. Our SPA Research Division has been making
detailed ballistic measurements on the M117, which we will use in developing our bombing technique.
Since we have not yet even received our Norden bombsights, nor had time to train our bombardiers in its use (maybe 12 weeks of state-side training), we will resort to an alternate bombing technique
called, “fixed angle bombing”. To see how this works, let’s have a look from the bombardier’s position in the nose of your aircraft.
This is the view from the B-26 Bombardier’s position. The complex-looking hardware in the center of the picture is a 50-caliber machine gun and, maybe, a non-functional bomb sight.
Notice the black arrow pointing at the greenish seam. That seam is the grommet holding a flat sighting window, which is the bombsight window. Note the red star shaped object in the
center of the window. That is your sighting point. When viewed from this observation position (all the way back, edge of plexiglass cone just above bottom border) the line through
this sighting point makes an approximately a 45 deg. angle up from the vertical. The intersection of this sight line with the terrain below is your sighting point. We will base our
bomb targeting on this sighting point. If the ballistics of a particular bomb dropped from this aircraft, at this position, altitude, and airspeed were to impact this point on the ground,
we would say that the dropping angle of the bomb was 45 deg. We would target the bomb by piloting our B-26 at a constant altitude and airspeed on a course directly toward the target until
the red star was on the target, and pickle the bomb. If all our calculations are correct, the bomb should slam directly into the target. Easy, right? But how do we adjust the bomb ballistics
so that this happens? This is where the work of the SPA Research Division (Ballistics Department) comes into play.
The next paragraph is technical in nature. If this is not your cup of tea, just skip over the italicized text and continue reading. After all, you’re just training to be a pilot, not a bombardier.
But you’ll still have to drop your own bombs.
This chart summarizes the currently available ballistics data on the M117R bomb. The range vs. drop altitude data are presented as the blue dots. There is one set of four points for drop at
200 KIAS and two points for drops at 245 KIAS. These data are still sparse, and approximate. We would welcome additional data from our trainees. The basic pattern in these data is simple
and intuitive. When you drop a bomb, it goes farther if you are at a higher altitude or higher airspeed. The green lines represent the most probable trends for the two airspeeds.
Since the drop angle (of the actual impact point, not the sight line) is Arctan(range/altitude), the red line represents points at which the drop of the first bomb in a line of bombs (a stick)
would have a drop angle of 45 deg. Points to the right of these lines have lower drop angles, and points to the left have higher drop angles. This suggests that, for the M-117R, the drop angle
for the first bomb at 200 KIAS would be 45 deg. for an aircraft altitude of about 1500 ft (the intersection of the red and green lines). However, at an altitude of 2000 ft., the bomb range will
be about 1650 ft. (intersection of the green line with the 4000 ft. altitude line) and the drop angle will be about 39.5 deg. In other words, the bomb will impact before, short of (below) the 45-deg.
aim point. If the bomb is released when the sight line is on the target, the first bomb will impact about 350 ft. short of the target. However, the bombs do not exit the bomb bay simultaneously,
even in a salvo. So, the second bomb will fall a little later than the first, and so on. This effect is enhanced if the bombs are dropped individually at a set interval, say one second. However,
at 200 KIAS (no wind), the aircraft moves about 340 ft. every second. Accordingly, the second bomb would impact 340 ft. downrange from the first (i.e. 10 ft. short of the target). Thus, a 45 deg.
drop angle at 2000 ft. and 200 KIAS will mean that the first bomb will impact slightly short of the target. This approach should be about optimal for a 3 bomb stick.
So, Lieutenant, that is why we have ordered you to drop your initial M117 bombs from 2000 ft. AGL at 200 KIAS, and at a 45-deg. sighting angle – because it will give you an approximately optimal
probability of getting a three bomb stick onto the target. This is fixed angle bombing. What we have done is to make the problem fit the solution, that’s fixed angle bombing.
Another word of caution. There is a lot of armor interior to the B-26 to protect the crew from interceptor fire or flak. This is a good thing, but won’t help much if your aircraft is seriously
damaged by ground fire. Fortunately, the B-26 is pretty tough, but at 2000 ft. there won’t be time to get out, and you know the rest. Attacking a well defended target from 2000 ft. is a very risky
business. When bombing from 2000 ft. it is comparatively easy to hit your target, but it is not so easy to get home.
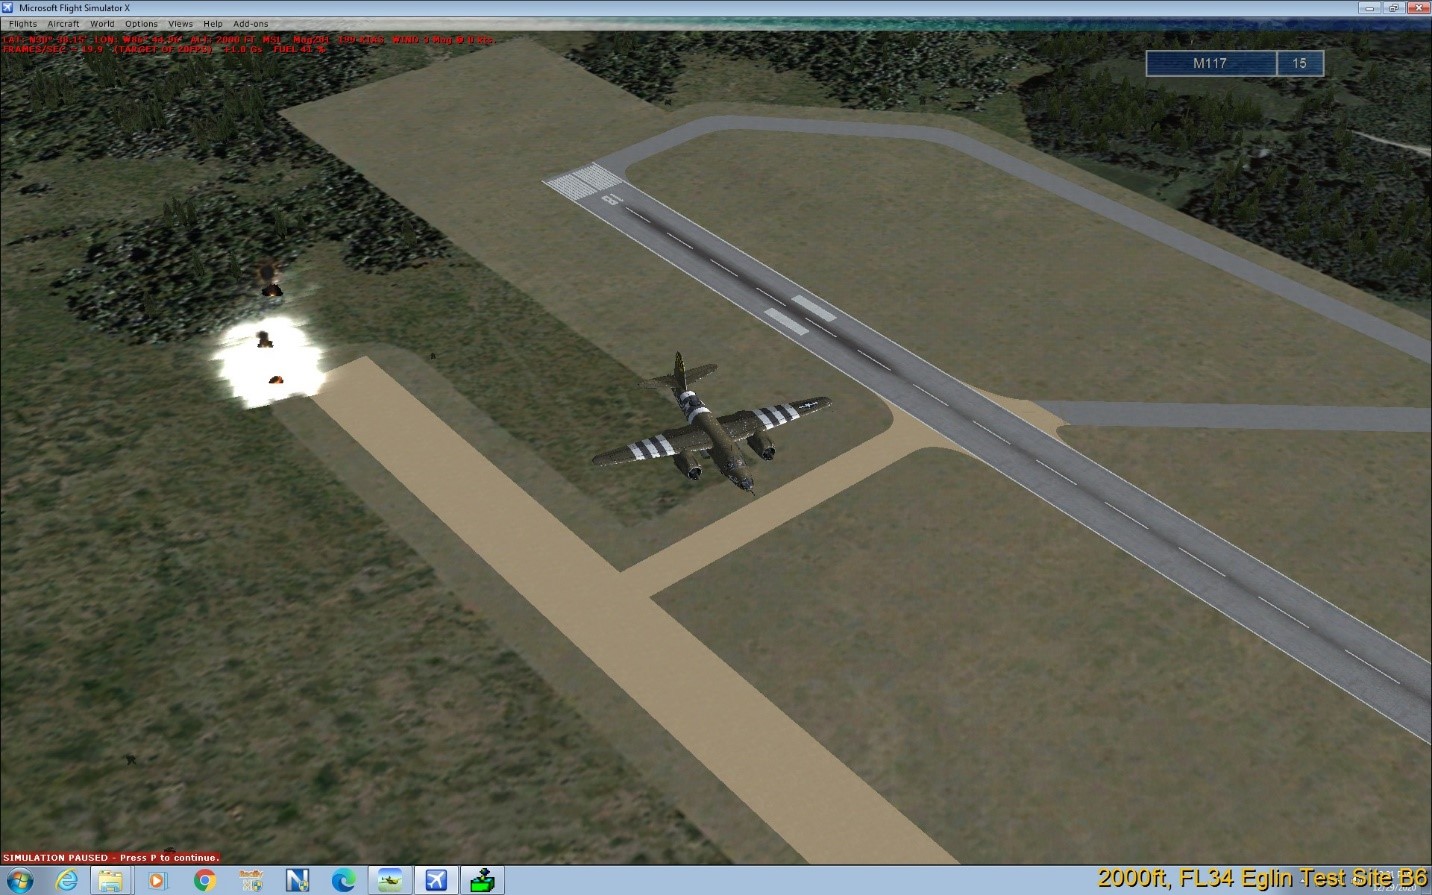
By the way, this really works. Look at the screen shot below: 2001 ft., 199 KIAS on the Thermal test range. First two bombs of a three-bomb stick. The third should finish off the ramp.
The black smoke plumes mark the impact points of the previous run. Experience will demonstrate that getting the bomb run line right is the key piece, range is easier because your bombs will drop
along the line. Most of the aircraft on this ramp would be toast and should be on fire – if only we could make that work.
902107 (KVPS-KVPS)
4/25/43. 1000 hrs., clear skies, 6 ea. M117R bombs. You’re up again Lt. This time you know what to do. Repeat the profile of mission 902106 and score your result. Repeat as desired.
Compare this run with 902106. Have you improved? Your results should look like this, but on the runway, not the taxiway.
902108 (KVPS-KVPS)
4/27/43. 0900 hrs. Low altitude attack. I promised you some fun, so here it comes. Repeat the 902106 mission profile, but this timefrom low altitude – no holds barred. Just bring the aircraft back.
Here’s where the fins on those M117Rs will save your bacon. This time you’re to attack the numbers on Rwy. 18 by means of a number of quick passes, each from a different angle. This is a vacation from
those boring constant speed and altitude bomb runs with everybody and their uncle targeting you the whole time. Forget about maintaining altitude (but always above ground level) or airspeed (always
above stall). Release the bombs when you think appropriate, but avoid the Kamikaze solution (known in the trade as “target fixation” – it happens, the results are not good). You will find that your
B-26 will fly almost like a fighter, highly banked steep 180 deg. turns will get you back to the target pronto. Just remember that you lose lift in a steeply banked turn, so watch your rate of climb
indicator. Score your results for six bombs. With some practice you can get pretty good at these low-level attacks.
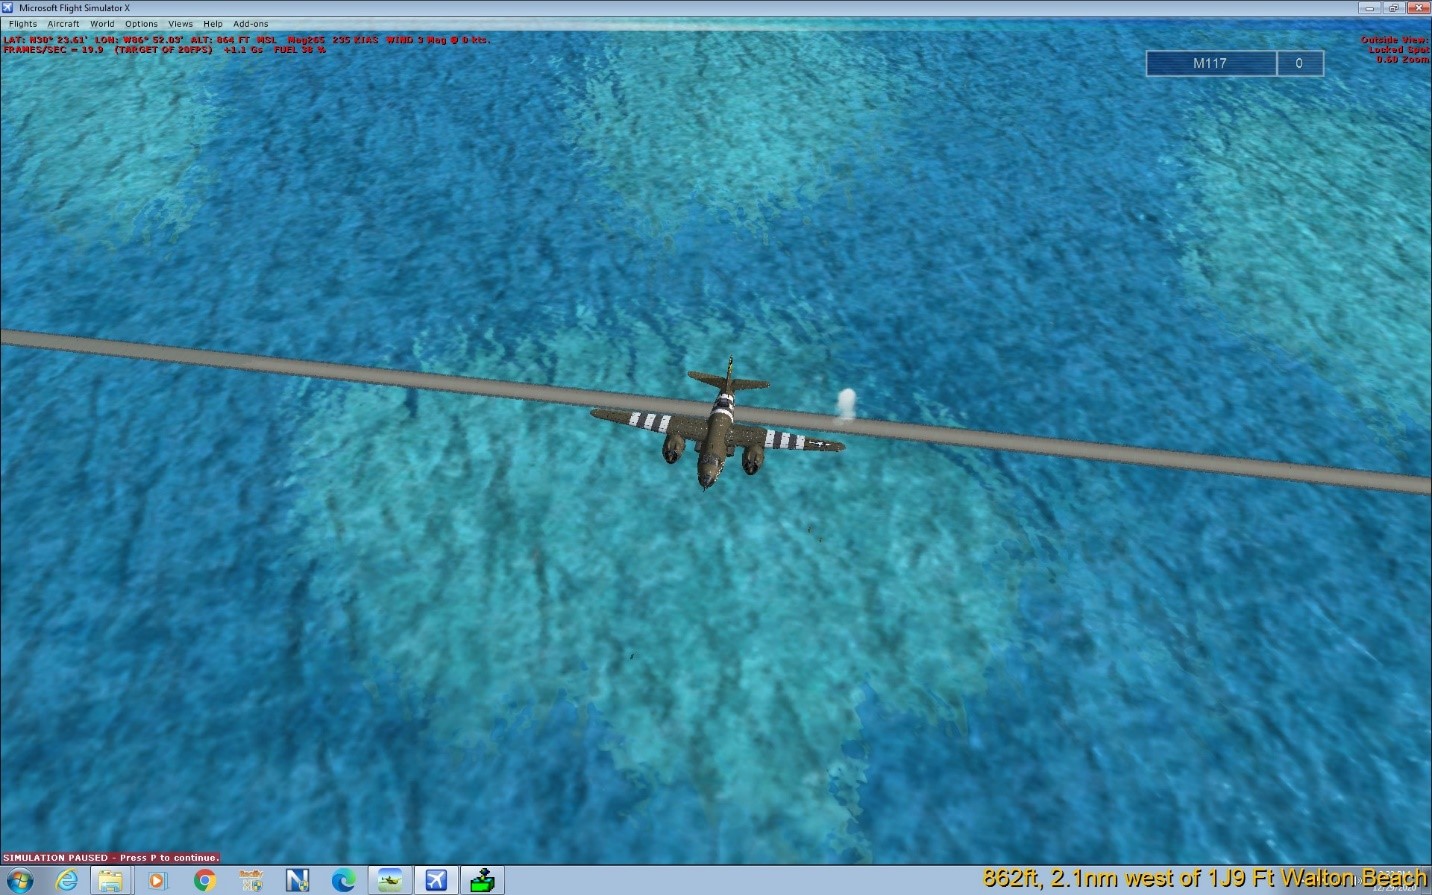
Check this out. I got the third bomb of a three-bomb stick smack dab on a narrow bridge deck – the equivalent of a hole in one. My secret, pay attention to the line, not the range (Oh, and 862 ft.).
Don’t try this at home.
Time to get back to work. If your bombing skills are limited to 2000 ft. and below, your European tour will be a short one for one of three reasons (1) You’re grounded by the Squadron Commander
because you’re of no use, (2) You’ll spend the duration in Stalag 17. I hear the food isn’t that bad, or (3) Your tail number didn’t return to base. Don’t worry, your bunk area and locker will
be cleaned out before your wingman returns – bad for morale.
Soooo… You’re going to have to learn to bomb from “intermediate altitudes”. That’s 10,000 ft. below the B-17s and 10,000 ft. above the P-47s. In the ETO your bomb run instructions will be part
of the morning mission briefing. For training, we’ll standardize on 10,000 ft. and 245 KIAS.
For you technical (bomb/Nav) types, I’ll explain our approach. You may not want to explain this to the pilots, it’s probably best if they don’t know. Let’s go back up to that M117R ballistics
chart. Focus on the point at 245 KIAS and 10,000 ft. Get out your trig tables and look up the target drop angle. It’s way to the right of the red line, so the drop angle is (a) a lot more than
45 deg, (b) a lot less than 45 deg. If you answered (a,) you might want to talk to your Squadron C.O. about becoming a co-pilot. That’s right, the Arctan of 3000 ft./ 10000 ft. is 16.7 deg.
Let’s see, the drop angle is measured forward from the vertical, so the impact point is almost directly below the airplane. That’s what you get for using those M117R bombs. After a while,
they’re basically falling straight down. What can we do about this? We might try getting a really high stool installed in the bombardier compartment, so we can peer over the nose and look almost
straight down. However, that won’t work unless we remove the machine gun and the plexiglass nose cone. Gonna be pretty windy too. On top of that, how will we accurately determine the sighting
angle. Clearly, another approach is required. That’s why we have these pointy headed guys here in the SPA Research Division. We’ll call this the “Westcoast” bombsight. It’s going to take either a
good map of the target area or a good reconnaissance photo of the area, preferably both. What we can see is the sighting point, looking down at 45 deg. ahead of the aircraft. If we’re flying 10,000 ft.
above the terrain, this point is 10,000 ft. in front of the aircraft’s current position along the bomb run track. If we have a crosswind, we’ll have crab the aircraft to maintain the bomb run course
heading, and this will complicate the optics. This is one of those problems the Norden bombsight was designed to handle, but that’s tough – we deploy in June. So, here is the geometry of our
solution:

So, here’s the basic idea. Using a good, scaled map/photo of the target area, center a compass on the target (T) and strike an arc of radius O. Select an identifiable, prominent, visible
displaced target (DT) somewhere on the arc of radius O. Draw a line connecting DT to T. Extend this line on either side of both points. This is the direction of your bomb run track. You
will start your bomb run at an easily identified initial point (IP) on the target side of the bomb run track, at an appropriate distance from the target to allow the bombardier to sight the
target and, at the same time, stabilize the altitude, airspeed and aircraft track. You will learn to do this by going to the bombardier’s position, sighting the (displaced) target and using
your simulator controls to con the aircraft. This is how it actually worked on a real bomb run; the bombardier conned the aircraft during the bomb run. You will then fly this track as your
aiming point (as viewed from the bombardier’s position) crosses the target and then crosses the displaced target, at which point you will release your bombs.
Let’s see what this would like against a realistic target. Suppose we were targeting Eglin Main (of course we are the good guys, and would never do this). Our targets are a major hangar and a ramp
partially filled with aircraft which look they might be C-130s. These are inside the red box in the overhead reconnaissance photo of Eglin below. We can only hope that the recce guys can do this well
over occupied France. The hangar is the white object at the bottom of the box and the aircraft are the dark objects on the pad above it. So, if we are to target these from our B-26 at 10,000 ft. and
435 KIAS, we know that the range (R) of our M117R bombs will be about 3000 ft. So, the target offset distance will be O = A – R = 7000ft.
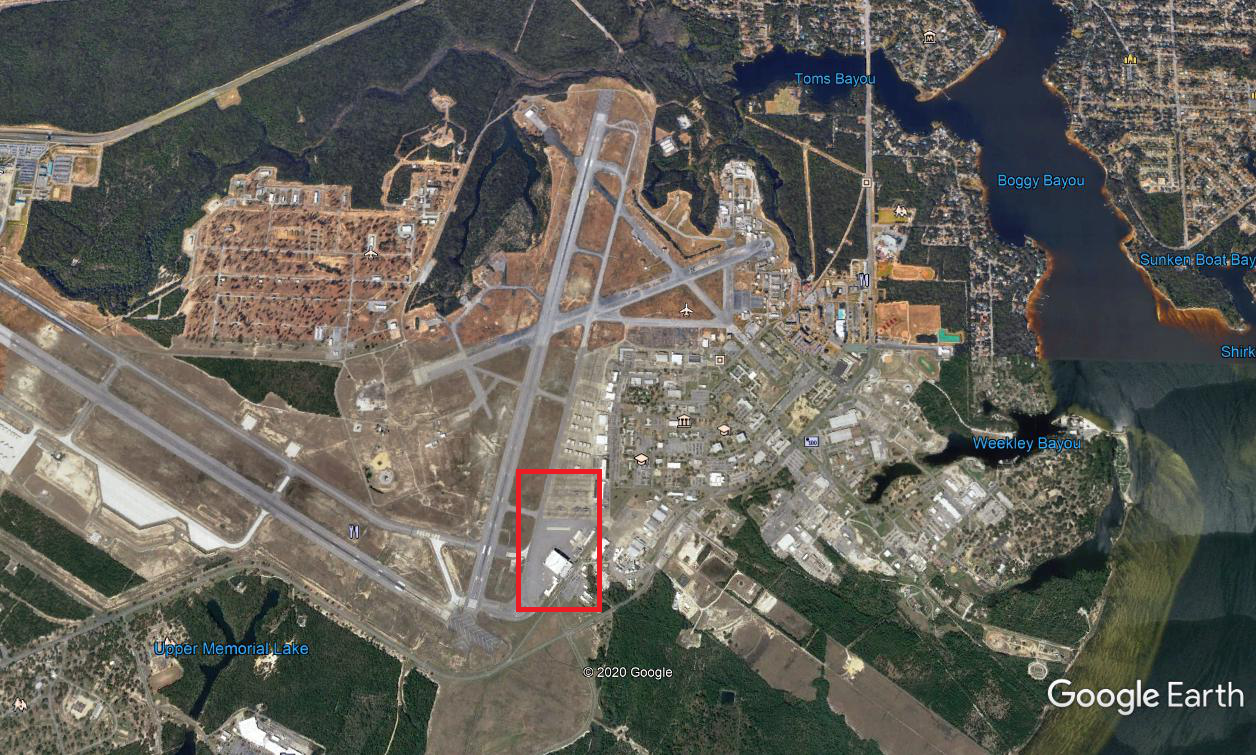
So, we construct a circle with a radius of 7000 ft. and center it on our target.

Next, we look for a convenient displaced target (DT) on the circumference of this circle. I have chosen the intersection of taxiways U and R near the top of the circle, because I think
it will be best to begin the bomb run over the water of the Gulf (south of Eglin). I then draw a straight line from this point (DT) back through the target and extend it south beyond the
target. This is our bomb run track. Since the adjacent runway has a heading has a heading of 12 deg., it looks like our bomb run track will be about 2 or 3 deg. We could think of this as
another application of fixed angle targeting, because we are still releasing our bombs when that 45 deg sighting line intersects the target, but, in this case it’s a displaced target.
902109 (KVPS-KVPS)
5/11/43 0930 hrs. Clear skies. Prepare a displaced target bomb run against the numbers on Rwy. 18 from an altitude of 10,000 ft. and at 245 KIAS. Select your displaced target to be south of the
north end of Rwy. 18. This will give you a bomb run track between 090 and 270. We don’t want any bomb overruns exiting the range. Once again you can fly and log this mission multiple times.
Take your best cumulative score for six bombs and compare it to your best from 2000 ft. How did you do?
Keep working at it, because we don’t have a lot of time left. Try refining our determination of the bomb sighting angle from our chosen spot in the bomb window. Work on refining our M117R
ballistics data. Share what you learn with your fellow 387th BG pilots; we’re all in this together. Word is that the 387th will be getting a 10 day leave at the beginning of April. You know
what that means.